Residential Solar — Installation Guide
Installation Guide
You've picked your system size, chosen your components, and set your budget. Now someone has to actually put it all together. This section covers who should do it, what your roof needs to handle it, and what the full process looks like from first drill hole to net metering approval.
You Don't Need to Be an Electrician
Your installer or licensed electrician handles all the technical wiring. This section helps you understand what they're doing and what to expect — you don't need to memorize any of this.
Solar Site Assessment — Can Your Roof Handle Solar?
Before spending a single peso, check these five factors. Each one affects how much energy your system actually produces.
1. Roof Orientation (Direction)
Your roof's direction determines how much sunlight your panels receive:
| Direction | PH Effectiveness | Notes |
|---|---|---|
| South-facing | ✅ 100% (ideal) | Maximum sun exposure all day. Philippines is in the northern hemisphere — south-facing roofs get the most direct sunlight. |
| East-facing | ⚠️ ~85% | Good morning production, weaker afternoon. Still viable. |
| West-facing | ⚠️ ~85% | Weaker morning, good afternoon production. Still viable. |
| North-facing | ❌ ~60-70% | Least sun exposure. Usually not recommended unless you have no other option. |
| Flat roof | ✅ ~95% | Use tilt frames angled south at 10-15°. Very common in PH. Almost as good as south-facing. |
How to check your roof direction
Open Google Maps on your phone, find your house, and note which direction your roof slopes face. North is always up on Google Maps. Alternatively, use a compass app on your phone — stand facing your main roof slope and read the direction.
2. Shade Analysis (Critical)
Shade is the #1 system killer. Even partial shade on ONE panel can reduce your ENTIRE string's output by 30-70%.
What to check: - [ ] Neighboring buildings — will they cast shadows on your roof? At what time of day? - [ ] Trees — especially growing trees that may shade your roof in 2-5 years - [ ] Water tanks, antennas, satellite dishes on YOUR roof - [ ] Power lines or poles near your roof line - [ ] Future construction — could the empty lot next door become a 3-story building?
How to test yourself:
The Shadow Test
Go to your roof (or observe it from the ground) at three times:
- 9:00 AM — Check for morning shadows
- 12:00 PM — Check for midday shadows (this is peak production time)
- 3:00 PM — Check for afternoon shadows
If any area has shade during 10 AM - 2 PM (your peak production window), avoid placing panels there. Take photos with timestamps — show these to your installer.
Shade loss estimates:
| Shade Situation | Production Loss | Impact |
|---|---|---|
| No shade (10 AM - 2 PM) | 0% | ✅ Ideal |
| Light shade (tree dappling) for 1 hour | 5-10% | ✅ Acceptable |
| Partial shade (building shadow) for 2 hours | 15-25% | ⚠️ Significant — consider microinverters |
| Heavy shade (building blocks sun) for 3+ hours | 30-50% | ❌ Major issue — relocate panels or reconsider |
| Panel-level shade (antenna/vent on one panel) | 20-40% per string | ❌ Move the obstruction or use microinverters |
Future Shade Risk
That empty lot next to your house? If someone builds a 3-story building there, it could shade your panels for half the day. Consider:
- The maximum building height allowed in your area (check with your barangay/LGU)
- Whether neighboring lots are likely to be developed
- Placing panels on the side of your roof AWAY from potential future construction
3. Roof Structural Capacity
Each 550-620W panel weighs 28-35 kg. A 10-panel system adds 280-350 kg to your roof, plus mounting hardware (~50 kg).
| Roof Type | Typical Capacity | Notes |
|---|---|---|
| Metal/GI sheet (standard PH) | ✅ Usually sufficient | Most common. Ensure purlins (the metal bars under the roof) are spaced every 60-80 cm. |
| Concrete flat roof | ✅ Strong | Best structural support. Use tilt frames. |
| Tile roof | ⚠️ Check carefully | Tiles can crack under mounting brackets. May need specialized mounting. |
| Old wooden truss (pre-2000) | ⚠️ Get assessed | May need reinforcement. Budget ₱15-30K for structural upgrades. |
How to check
If you can walk on your roof without it flexing or sagging, it can probably support panels. But for peace of mind, ask your installer to inspect the purlins and truss system. A structural assessment costs ₱2,000-5,000 and is worth it for roofs older than 15 years.
4. Sun Hours Calculator
Estimate your actual daily solar production using this formula:
Daily Production (kWh) = System Size (kWp) × Peak Sun Hours × System Efficiency (0.78)
The 0.78 efficiency factor accounts for all real-world losses:
| Loss Type | Typical Loss | Explanation |
|---|---|---|
| Heat (temperature) | 8-12% | PH rooftops hit 50-60°C. Panels lose ~0.35%/°C above 25°C. |
| Inverter efficiency | 3-5% | Converting DC to AC isn't 100% efficient. |
| Cable/wiring losses | 1-3% | Longer cable runs = more loss. Keep cables short. |
| Dust/dirt | 2-5% | PH air quality varies. Rain cleans most of it. |
| Shade (if any) | 0-25% | See shade analysis above. |
| Panel mismatch | 1-2% | Slight manufacturing differences between panels. |
| Total typical loss | ~22% | That's why we use 0.78 efficiency |
 Real-world solar systems lose about 22% of their rated output. Here's where it goes — heat is the biggest factor in Philippine climate.
Example for your 6.2 kWp system in Metro Manila:
6.2 kWp × 4.5 PSH × 0.78 = 21.8 kWh/day (real-world)
vs. ideal: 6.2 × 4.5 = 27.9 kWh/day
That 21.8 kWh/day = ~654 kWh/month. At ₱13/kWh, that's ₱8,500/month savings.
5. Pre-Assessment Checklist
Before contacting any installer, complete this checklist:
- Measured roof area (length × width of usable sections, in meters)
- Identified roof direction using Google Maps or compass app
- Performed shadow test at 9 AM, 12 PM, and 3 PM — took photos
- Checked for future shade risks (empty lots, growing trees)
- Inspected roof condition (age, material, any visible sagging or damage)
- Located your electrical panel (the gray box with circuit breakers) — is there wall space nearby for an inverter?
- Checked 3 months of electricity bills — noted average monthly kWh consumption
- Identified where to mount battery (if going hybrid) — needs ventilated area, not direct sunlight
- Identified EV charger location (if applicable) — garage/carport with wall space
DIY vs Installer vs Semi-DIY
There are three realistic approaches, each with different cost, risk, and effort profiles:
| Approach | Cost Savings | Warranty | Permits | Safety | Best For |
|---|---|---|---|---|---|
| Full-service installer | 0% (baseline) | Full | Handled | Professional | Hands-off buyers |
| Semi-DIY (recommended) | 30–40% | Partial (component warranty) | You handle | Licensed electrician | Budget-conscious + technical |
| Full DIY | 40–50% | Component only | You handle | Your responsibility | Experienced electricians only |
Electrical Safety Warning
Solar systems operate at voltages that can kill you and currents that can burn your house down. Even experienced IT professionals should hire a licensed electrician for the DC wiring and grid connection. The savings from full DIY are not worth the risk.
The semi-DIY approach is the sweet spot for most technically capable homeowners: you source your own components (saving 30–40% on markup), handle the physical mounting yourself, and hire a licensed electrician for all wiring and grid connection work. You get significant cost savings without taking on the electrical risk.
"The energies you are dealing with here are well beyond the KILL YOU and BURN YOUR HOUSE DOWN territory." — u/Dragnier84
Roof Assessment
Before anything goes on your roof, the roof itself needs to be evaluated across four dimensions:
- Structural load: Each panel weighs ~25kg. A 10-panel system adds 250kg to your roof. Most Philippine metal roofs handle this fine, but older or weaker structures may need reinforcement (₱15–30K). When in doubt, have a structural engineer assess it.
- Orientation: South-facing is ideal in the Philippines (we're in the northern hemisphere, so south-facing catches the most sun). East/west-facing works but yields roughly 15% less energy. North-facing is poor and should be avoided if alternatives exist.
- Shade analysis: This is critical and often underestimated. Shade on ONE panel in a string drops the ENTIRE string's output — not just that panel. Walk your roof at different times of day and check for: trees (especially ones that will grow), neighboring buildings, water tanks, satellite dishes, and roof protrusions. Even a small shadow from a cable at noon can cost you 20–30% of daily output.
- Tilt angle: Roughly 10–15° is optimal for Philippine latitude (~14°N). Most corrugated metal roofs already have sufficient tilt built in. Flat concrete roofs need tilt frames (₱3,000–8,000 per frame), which add cost but also improve airflow under panels — keeping them cooler and more efficient.
Installation Costs
Labor and ancillary costs that don't show up in component quotes:
| Item | Cost Range |
|---|---|
| Labor per kW (metal roof) | ₱7,000–20,000 |
| Labor per kW (tile/complex roof) | ₱12,000–25,000 |
| Electrical panel upgrade (upgrading your home's main electrical capacity — think of it like water pressure: 100A is like a standard garden hose, 200A is like a fire hose — you need enough capacity for all your appliances plus solar) | ₱10,000–25,000 |
| Roof reinforcement (if needed) | ₱15,000–30,000 |
| Permits + interconnection | ₱5,000–8,000 |
| Annual maintenance contract | ₱3,000–6,000/year |
Labor rates vary significantly by region — Metro Manila and Cebu skew higher; provincial installs are often cheaper. Get at least three quotes, and ask specifically whether the quote includes electrical inspection fees and permit filing.
Safety Requirements
These aren't optional — several are required by the Philippine Electrical Code and by your utility for grid interconnection:
- DC isolator switch (a dedicated on/off switch for the solar side of the system — mandatory, allows safe shutdown for maintenance or emergencies)
See what a DC isolator switch looks like
View on Lazada — a yellow or red rotary switch mounted near the inverter. You turn it to cut power from the panels for maintenance.
-
Proper grounding and earthing on all metallic components (connecting metal parts to the earth so stray electricity has a safe path instead of going through a person)
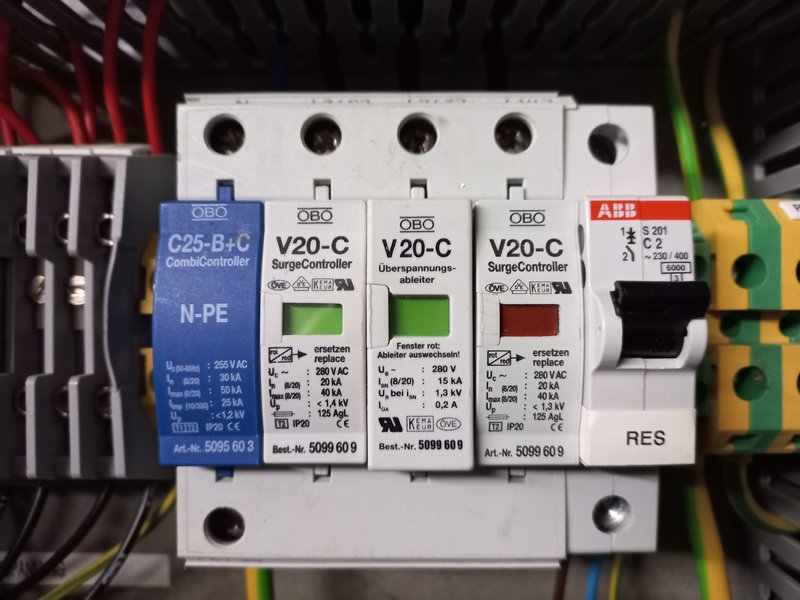 A surge arrester (SPD) — these small devices absorb voltage spikes from lightning strikes, protecting your inverter and wiring. Image: Wikimedia Commons, CC BY-SA 4.0
 -
Lightning protection and surge arresters (devices that absorb sudden voltage spikes — critical during typhoon season, a nearby lightning strike can destroy an inverter instantly)
- Fire-rated DC cables (special wiring that won't melt in the sun or crack over time — regular household wiring isn't suitable for rooftop use) with UV-resistant sheathing for rooftop exposure
- Anti-islanding protection (built into all grid-tied and hybrid inverters — automatically shuts your system off during a power outage, protecting utility workers who may be repairing lines nearby)
- Clearly labeled "SOLAR POWER" warning signs on your distribution board (the circuit breaker box — the metal panel with switches that controls all your home's electricity) and at the inverter
Skipping any of these is both dangerous and a grounds for your utility to reject your net metering application.
Timeline
Setting expectations is half the battle. Here's the realistic end-to-end timeline:
| Phase | Duration | Notes |
|---|---|---|
| Component sourcing | 1–4 weeks | Faster if buying local; imported panels/inverters may need lead time |
| Physical installation | 1–3 days | Depends on system size and roof complexity |
| Electrical inspection | 1–2 weeks | City Hall permit process; varies by LGU |
| Net metering approval | 2–8 months | See the Net Metering section for full details |
The net metering timeline is the longest and most variable part. Physical installation is quick — a 6kW system on a straightforward roof can be done in a single day. It's the bureaucratic tail that catches most homeowners off guard.
Previous: ← EV Charging | Next: Net Metering →